
Your first upload, step by step
Save2ERP saves the Word document you are writing directly to your company's business system (ERP, for example SAP), called the target system here. The document is added as an attachment to the object it was generated from: a quote, a contract, a customer file… You can send it in Word or PDF format, without saving it to your computer first.
Before you start
- The document must have been generated from the target system. The target system stores hidden information in it (the system, the object concerned, the suggested file name) that Save2ERP needs to know where to save the document. A blank or hand-made document cannot be sent.
- The add-in must be installed in Word. This is usually done by your IT department: the "Save to SAP" button then appears in the ribbon.
- You need an account in the target system that is allowed to add attachments to the object concerned.
- You must use Word with your work account (Microsoft 365): the Save2ERP license is checked with this account.
1. Open the pane
In Word, open the document generated by the target system, then click the "Save to SAP" button in the Save2ERP group, on the Home tab of the ribbon.

The Save2ERP pane opens on the right of the window. The first time, the "Please wait…" message may be shown for a few moments, while the document and the license are checked.
2. Sign in
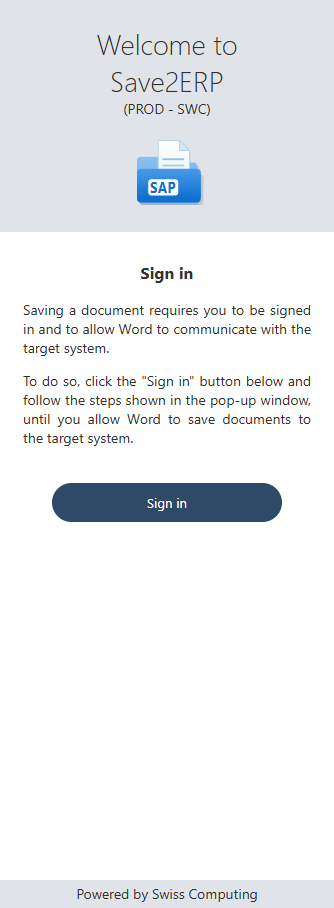
The first time, or when your session has expired, the pane asks you to sign in to the target system.
- Click "Sign in".
- A window opens on the sign-in page of the target system. Sign in if asked: depending on your company, this may happen automatically.
- The target system then asks you to allow Word to save documents on your behalf: accept.
- The window closes and the pane shows the save page.
You then stay signed in for several days: you do not need to sign in again for each document.
If you refuse the authorization
The pane shows "Sign-in canceled" and stays on the sign-in page: click "Sign in" again to start over.
3. Send the document
The file name is suggested automatically and the default format is Word (.docx). You can change both before sending: see Choosing the name and format.
Click "Save as .docx" (or "Save as .pdf"). The current version of the document, as displayed in Word, is always sent: you do not need to save it first.
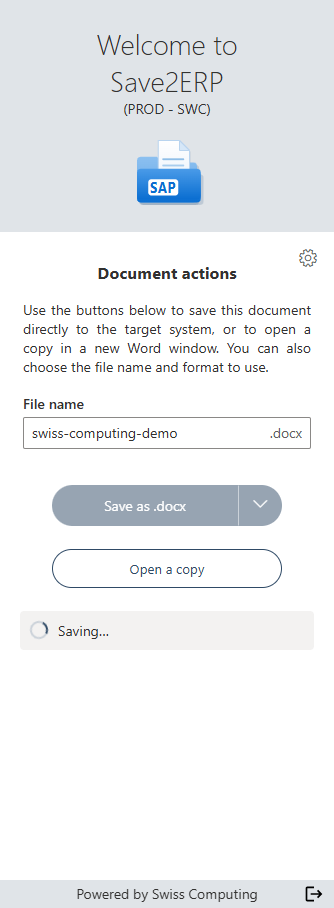
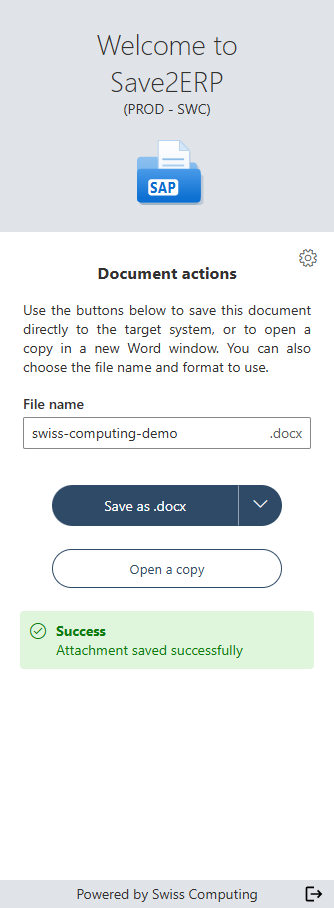
The result is shown just below the buttons:
- while sending, "Saving…" is shown and the button is grayed out: there is no need to click several times, the document is sent only once;
- on success, the green message "Attachment saved successfully" is shown;
- if there is a problem, a red message explains the cause: see Error messages and solutions.
If a file with the same name already exists in the object, the pane asks you what to do: see A file with the same name already exists.
After sending
If the document was opened from the target system (it is then in your Downloads folder or in a temporary folder), it is also saved automatically on your computer after sending, so Word will not ask you to save your changes when closing it. A document stored elsewhere, for example on a network share, is never saved automatically.